本文共 6761 字,大约阅读时间需要 22 分钟。
前面两篇博客中我们简单介绍了spring Boot项目的创建、并且也带小伙伴们来DIY了一个Spring Boot自动配置功能,那么这些东西说到底最终还是要回归到Web上才能体现出它的更大的价值,so,今天我们就来看一下如何使用Spring Boot来开发Web项目。当然,如果小伙伴对Spring Boot尚不熟悉的话,可以先参考一下这两篇博客:
1.
2.
Spring Boot 提供了spring-boot-starter-web来为Web开发予以支持,spring-boot-starter-web为我们提供了嵌入的Tomcat以及SpringMVC的依赖,用起来很方便。另外,我们这里还要用到模板引擎,我们做web开发可选的模板引擎还是挺多的,这里我主要使用Thymeleaf作为模板引擎,事实上,Spring Boot提供了大量的模板引擎,包括FreeMarker、Groovy、Thymeleaf、Velocity和Mustache,在 提供的这么多中它推荐使用Thymeleaf。Thymeleaf在使用的过程中通过ThymeleafAutoConfiguration类对集成所需要的Bean进行自动配置,通过ThymeleafProperties来配置Thymeleaf,包括前缀后缀什么的,我们可以查看ThymeleafProperties一段源码:
| 1 2 3 4 5 6 7 8 9 10 11 12 13 14 15 16 | @ConfigurationProperties ( "spring.thymeleaf" ) public class ThymeleafProperties { private static final Charset DEFAULT_ENCODING = Charset.forName( "UTF-8" ); private static final MimeType DEFAULT_CONTENT_TYPE = MimeType.valueOf( "text/html" ); public static final String DEFAULT_PREFIX = "classpath:/templates/" ; public static final String DEFAULT_SUFFIX = ".html" ; private boolean checkTemplate = true ; private boolean checkTemplateLocation = true ; private String prefix = "classpath:/templates/" ; private String suffix = ".html" ; private String mode = "HTML5" ; ...... ...... ...... } |
OK,从这一段源码中我们可以看到默认的页面后缀名为.html,前缀为classpath:/templates/,实际上也就是我们需要把html页面放到resources文件夹下的templates文件夹中。同时我们也看到了要如何修改这个配置,在application.properties文件中以spring.thymeleaf为前缀来配置相关属性。
关于Thymeleaf如果小伙伴们还不太了解可以先看看我在网上找到的这个资料。OK,这些算是准备工作了。接下来我们就从项目的创建开始看起吧。创建Project
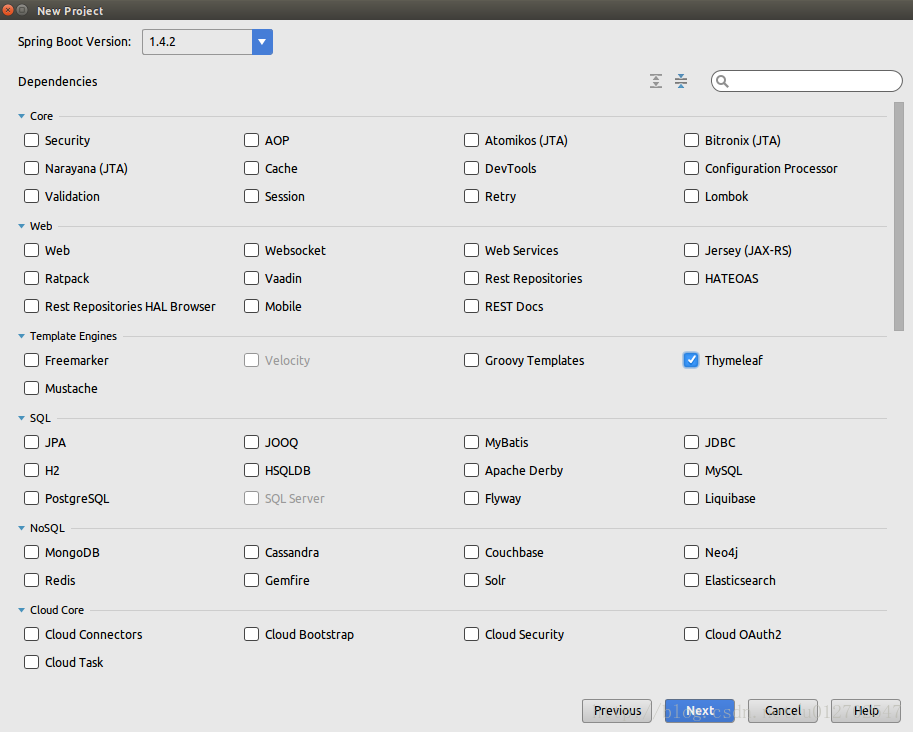
注意创建的时候要选择Thymeleaf作为依赖,这样创建成功的Project中将自动包含spring-boot-starter-web,如下图:
创建JavaBean
我一会要从后台传递数据给前台页面,数据的载体就是这个JavaBean,如下:
| 1 2 3 4 5 6 7 8 9 10 11 12 13 14 15 16 17 18 19 20 21 22 23 24 25 26 27 28 29 30 | public class Person { private String name; private Integer age; public Person() { super (); } public Person(String name, Integer age) { super (); this .name = name; this .age = age; } public String getName() { return name; } public void setName(String name) { this .name = name; } public Integer getAge() { return age; } public void setAge(Integer age) { this .age = age; } } |
后台数据构造
在入口类中添加如下代码,由后台向前台页面返回两条数据,一个单个的Person对象,还有一个people对象是一个List集合,集合中放了3个Person对象,到时候我们直接将这两条数据在html页面上显示出来,代码如下:
| 1 2 3 4 5 6 7 8 9 10 11 12 13 14 | @RequestMapping ( "/" ) public String index(Model model) { Person single = new Person( "aa" , 11 ); List<Person> people = new ArrayList<>(); Person p1 = new Person( "zhangsan" , 11 ); Person p2 = new Person( "lisi" , 22 ); Person p3 = new Person( "wangwu" , 33 ); people.add(p1); people.add(p2); people.add(p3); model.addAttribute( "singlePerson" , single); model.addAttribute( "people" , people); return "index" ; } |
这里的代码都很简单,不必我多说了,就是返回给前台页面两个对象,一个singlePerson,一个people,另外,我们的前台页面叫做index.html。
引入相关的静态文件
这里我使用到了Bootstrap和jQuery两个库,当然这个并不是必须的,只是为了让我们显示的效果更好看一些,静态文件我们要放在src/main/resources/static目录下。
1.
2.
放置之后目录如下:
前台展示页面
刚才小伙伴们都看到了,默认情况下前台页面要放在src/main/resources/templates目录下,so,我们在该目录下新建文件就叫index.html,如下:
| 1 2 3 4 5 6 7 8 9 10 11 12 13 14 15 16 17 18 19 20 21 22 23 24 25 26 27 28 29 30 31 32 33 34 35 36 37 38 39 40 41 42 43 | < html lang = "en" xmlns:th = "http://www.thymeleaf.org" > < head > < meta charset = "UTF-8" /> < title >Test20</ title > < link th:href = "@{bootstrap/css/bootstrap.min.css}" rel = "stylesheet" /> < link th:href = "@{bootstrap/css/bootstrap-theme.min.css}" rel = "stylesheet" /> </ head > < body > < div class = "panel panel-primary" > < div class = "panel-heading" > < h3 class = "panel-title" >访问Model</ h3 > </ div > < div class = "panel-body" > < span th:text = "${singlePerson.name}" ></ span > </ div > </ div > < div th:if = "${not #lists.isEmpty(people)}" > < div class = "panel panel-primary" > < div class = "panel-heading" > < h3 class = "panel-title" >列表</ h3 > </ div > < div class = "panel-body" > < ul class = "list-group" > < li class = "list-group-item" th:each = "person:${people}" > < span th:text = "${person.name}" ></ span > < span th:text = "${person.age}" ></ span > < button class = "btn" th:onclick = "'getName(\''+${person.name}+'\');'" >获得名字</ button > </ li > </ ul > </ div > </ div > </ div > < script th:src = "@{jquery-3.1.1.js}" type = "text/javascript" ></ script > < script th:src = "@{bootstrap/js/bootstrap.min.js}" type = "text/javascript" ></ script > < script th:inline = "javascript" > var single = [[${singlePerson}]]; console.log(single.name+"/"+single.age); function getName(name) { console.log(name); } </ script > </ body > </ html > |
关于这一段html文件我简单介绍一下,首先通过xmlns:th="http://www.thymeleaf.org"导入命名空间,在后期时候的时候,由于html本身是静态视图,在使用相关属性的时候加上th:前缀可以使之变为动态视图。th:href="@{bootstrap/css/bootstrap.min.css}"表示引用Web静态资源。OK,这是head部分。body部分整体上分为了两大块,第一块显示我那个单独的Person对象,第二部分显示List集合中的Person对象。div的样式这个没啥好说的,照着Bootstrap的官网写就行了,th:text="${singlePerson.name}"表示访问model中singlePerson的name属性,th:if="${not #lists.isEmpty(people)}"表示判断model中的people集合是否为空,th:each="person:${people}"表示遍历people中的元素,这个和Java里的foreach差不多,person表示迭代元素。th:onclick="'getName(\''+${person.name}+'\');'"表示添加点击事件,点击事件由JavaScript来处理。th:inline="javascript"这样添加到的script标签可以通过[[${singlePerson}]]访问model中的属性。
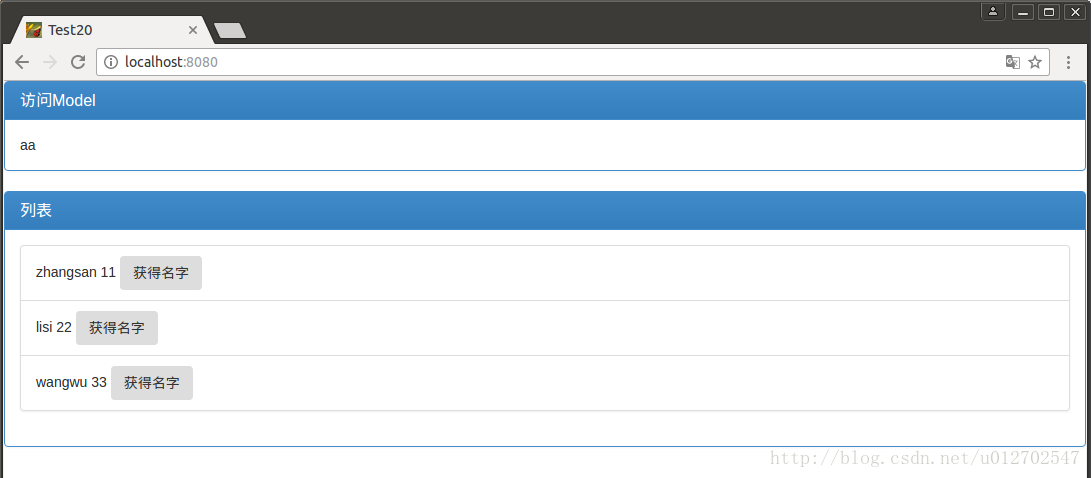
如此之后,我们便可以运行我们自己的项目了,然后在浏览器中访问,结果如下:
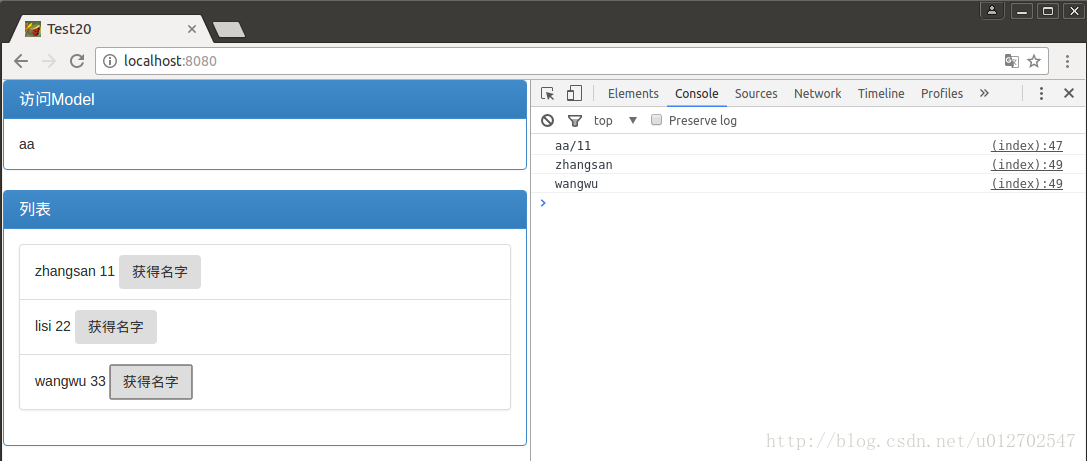
点击Button也可以在浏览器控制台看到log输出:
OK,perfect!
Tomcat相关配置
上面几乎没做什么特别的配置,大部分都使用了SpringBoot提供的默认的配置方式。有的时候我们可能需要有一些自定义的配置,比如Tomcat的配置,很简单,和说的基本一致,有两种不同的配置方式:
在application.properties中配置
直接在application.properties中进行配置即可,如下:
| 1 2 3 4 5 | server.port=8081#配置服务器端口,默认为8080 server.session-timeout=1000000#用户回话session过期时间,以秒为单位 server.context-path=/index#配置访问路径,默认为/ server.tomcat.uri-encoding=UTF-8#配置Tomcat编码,默认为UTF-8 server.tomcat.compression=on#Tomcat是否开启压缩,默认为关闭 |
在代码中进行配置
| 1 2 3 4 5 6 7 8 9 | @Component public class CustomServletContainer implements EmbeddedServletContainerCustomizer { @Override public void customize(ConfigurableEmbeddedServletContainer container) { container.setPort( 8080 ); container.addErrorPages( new ErrorPage(HttpStatus.NOT_FOUND, "/404.html" )); container.setSessionTimeout( 10 , TimeUnit.MINUTES); } } |
自定义类实现
EmbeddedServletContainerCustomizer接口,然后设置端口、设置错误请求页面、设置会话超时时间等,大家注意这里的404页面放在src/main/resources/static文件夹下,有了这个之后,当我访问一个不存在的页面的时候就会跳转到404.html页面了。SpringMVC相关配置
虽然Spring Boot默认的配置很多情况都可以满足我们的项目需求,可是有的时候我们可能还是会需要更加灵活的SpringMVC配置,这个时候我们只需要自定义类继承自WebMvcConfigurerAdapter,然后使用@Configuration和@EnableWebMvc注解,这样我们会完全屏蔽掉Spring Boot的默认配置,但是正常情况下我们可能只是希望在Spring Boot已有默认配置的基础上再添加一些配置即Spring Boot提供的默认配置和我自定义的配置并存的情况,这个也简单,只需要去掉@EnableWebMvc注解就行了。如下代码:
| 1 2 3 4 5 6 7 8 9 | @Configuration //@EnableWebMvc//无需使用该注解,否则会覆盖掉SpringBoot的默认配置值 public class WebMVCConfig extends WebMvcConfigurerAdapter { @Override public void addViewControllers(ViewControllerRegistry registry) { registry.addViewController( "/hello" ).setViewName( "/hello" ); } } |
至于这个类里边的其他方法我就不再赘述了,有兴趣的小伙伴可以查看我们之前的文章。
本案例下载地址:
以上。
参考资料:
《JavaEE开发的颠覆者 Spring Boot实战》第七章
原文出处:
from: http://www.importnew.com/22854.html